Development
Create and Release Your Apps
Preparation
Register Lovense Developer account to access the developer dashboard.
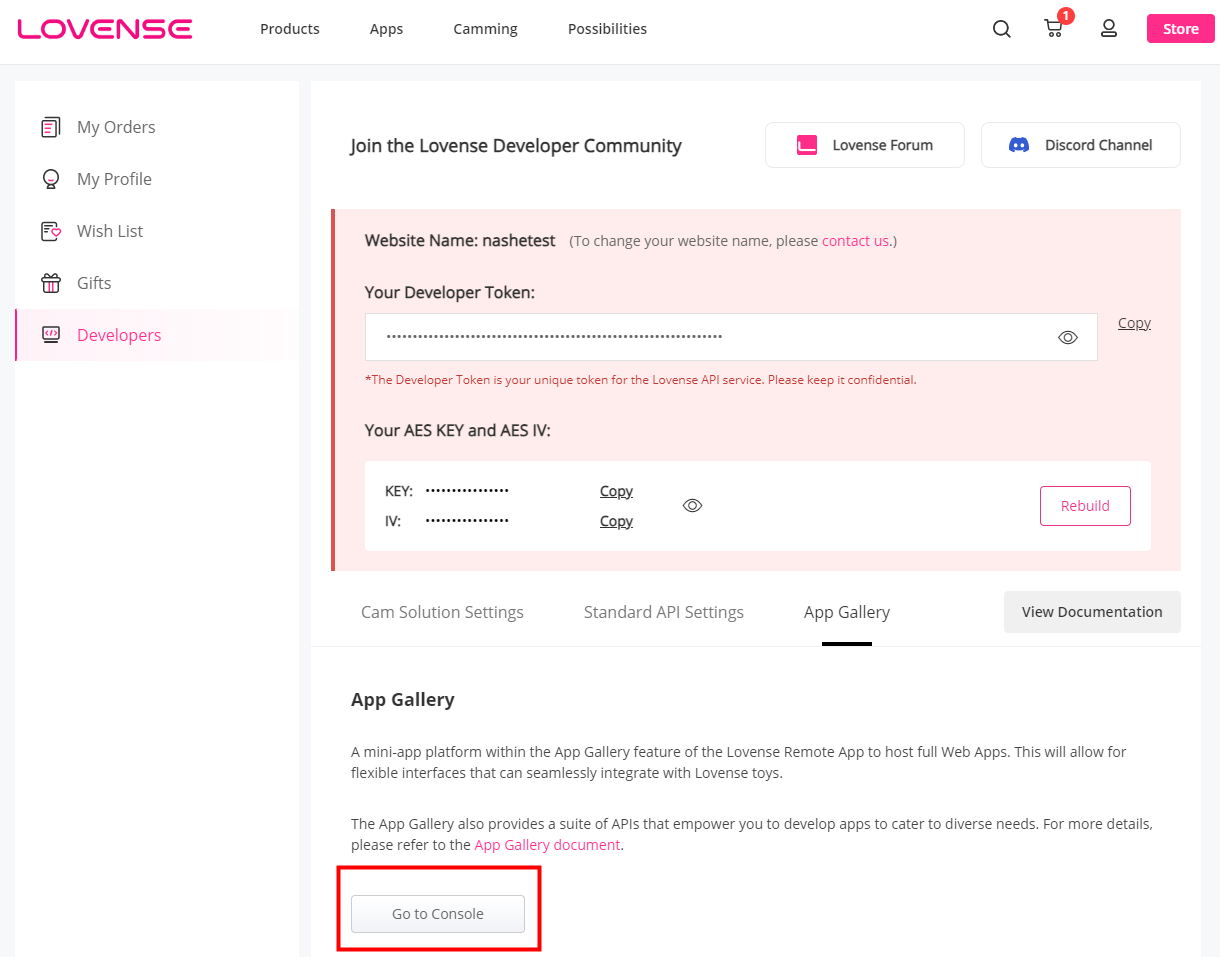
Step 1: Go to the App Gallery Console
Visit the developer console and click on App Gallery solutions, then click the "Go to Console" button.
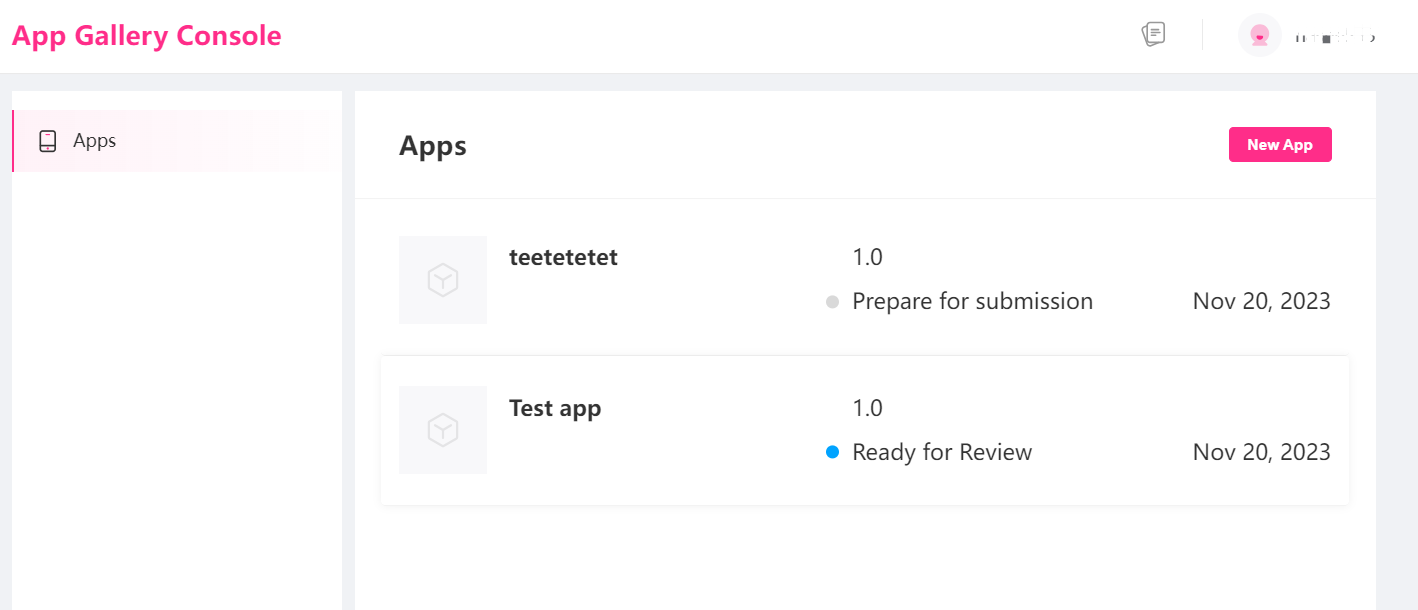
Step 2: Create a New App and fill in the Basic Information
Click the "New App" button on the Apps page to create a new App.
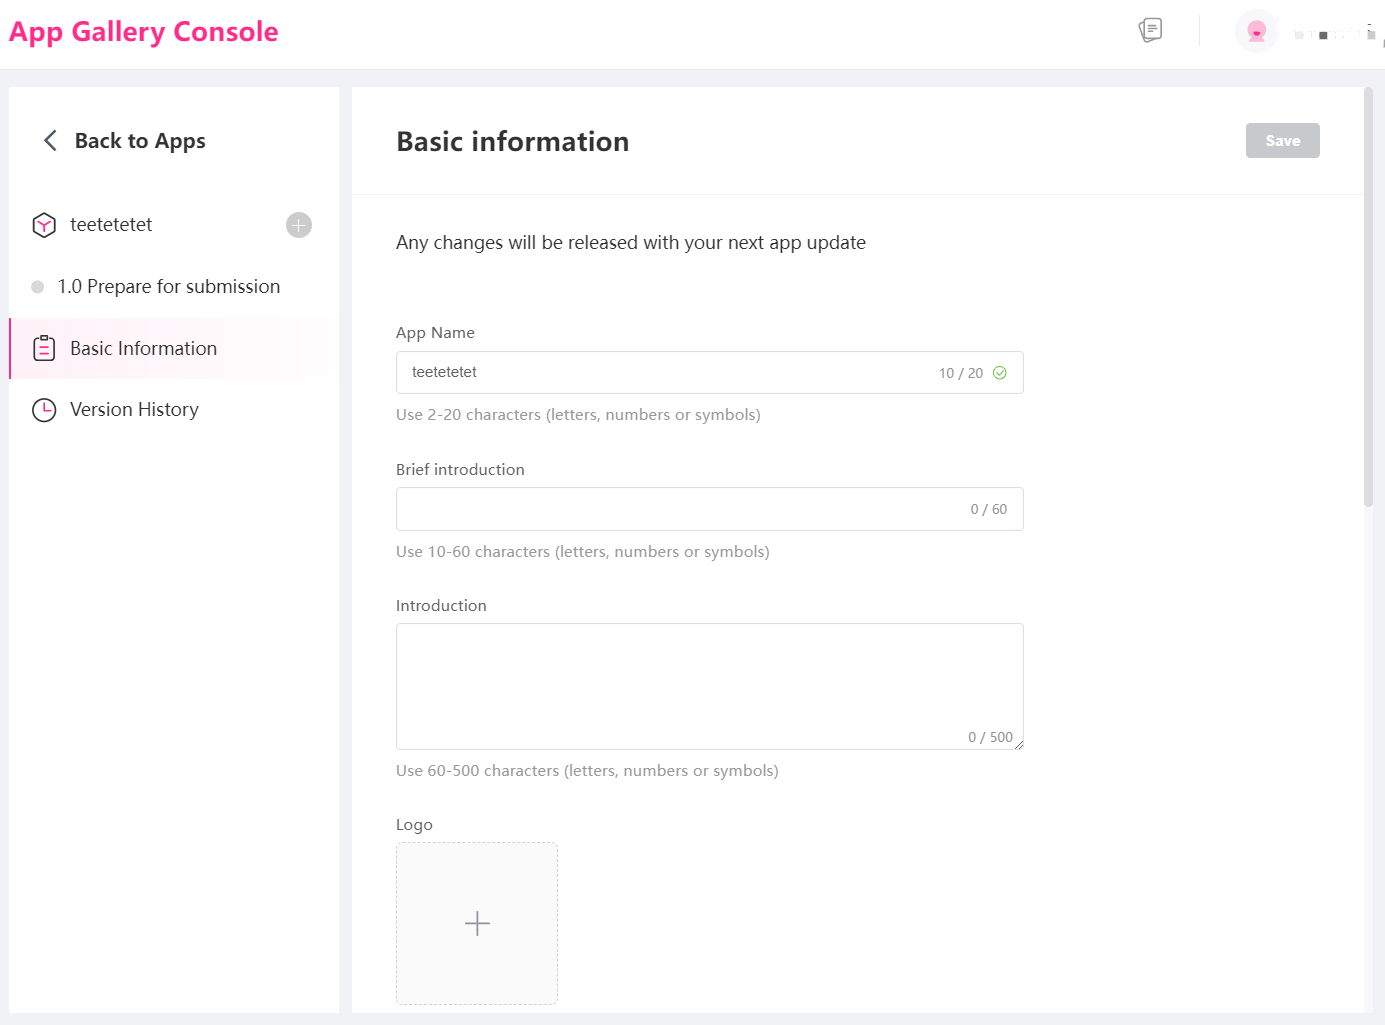
Click on "Basic Information" in the sidebar and complete the form.
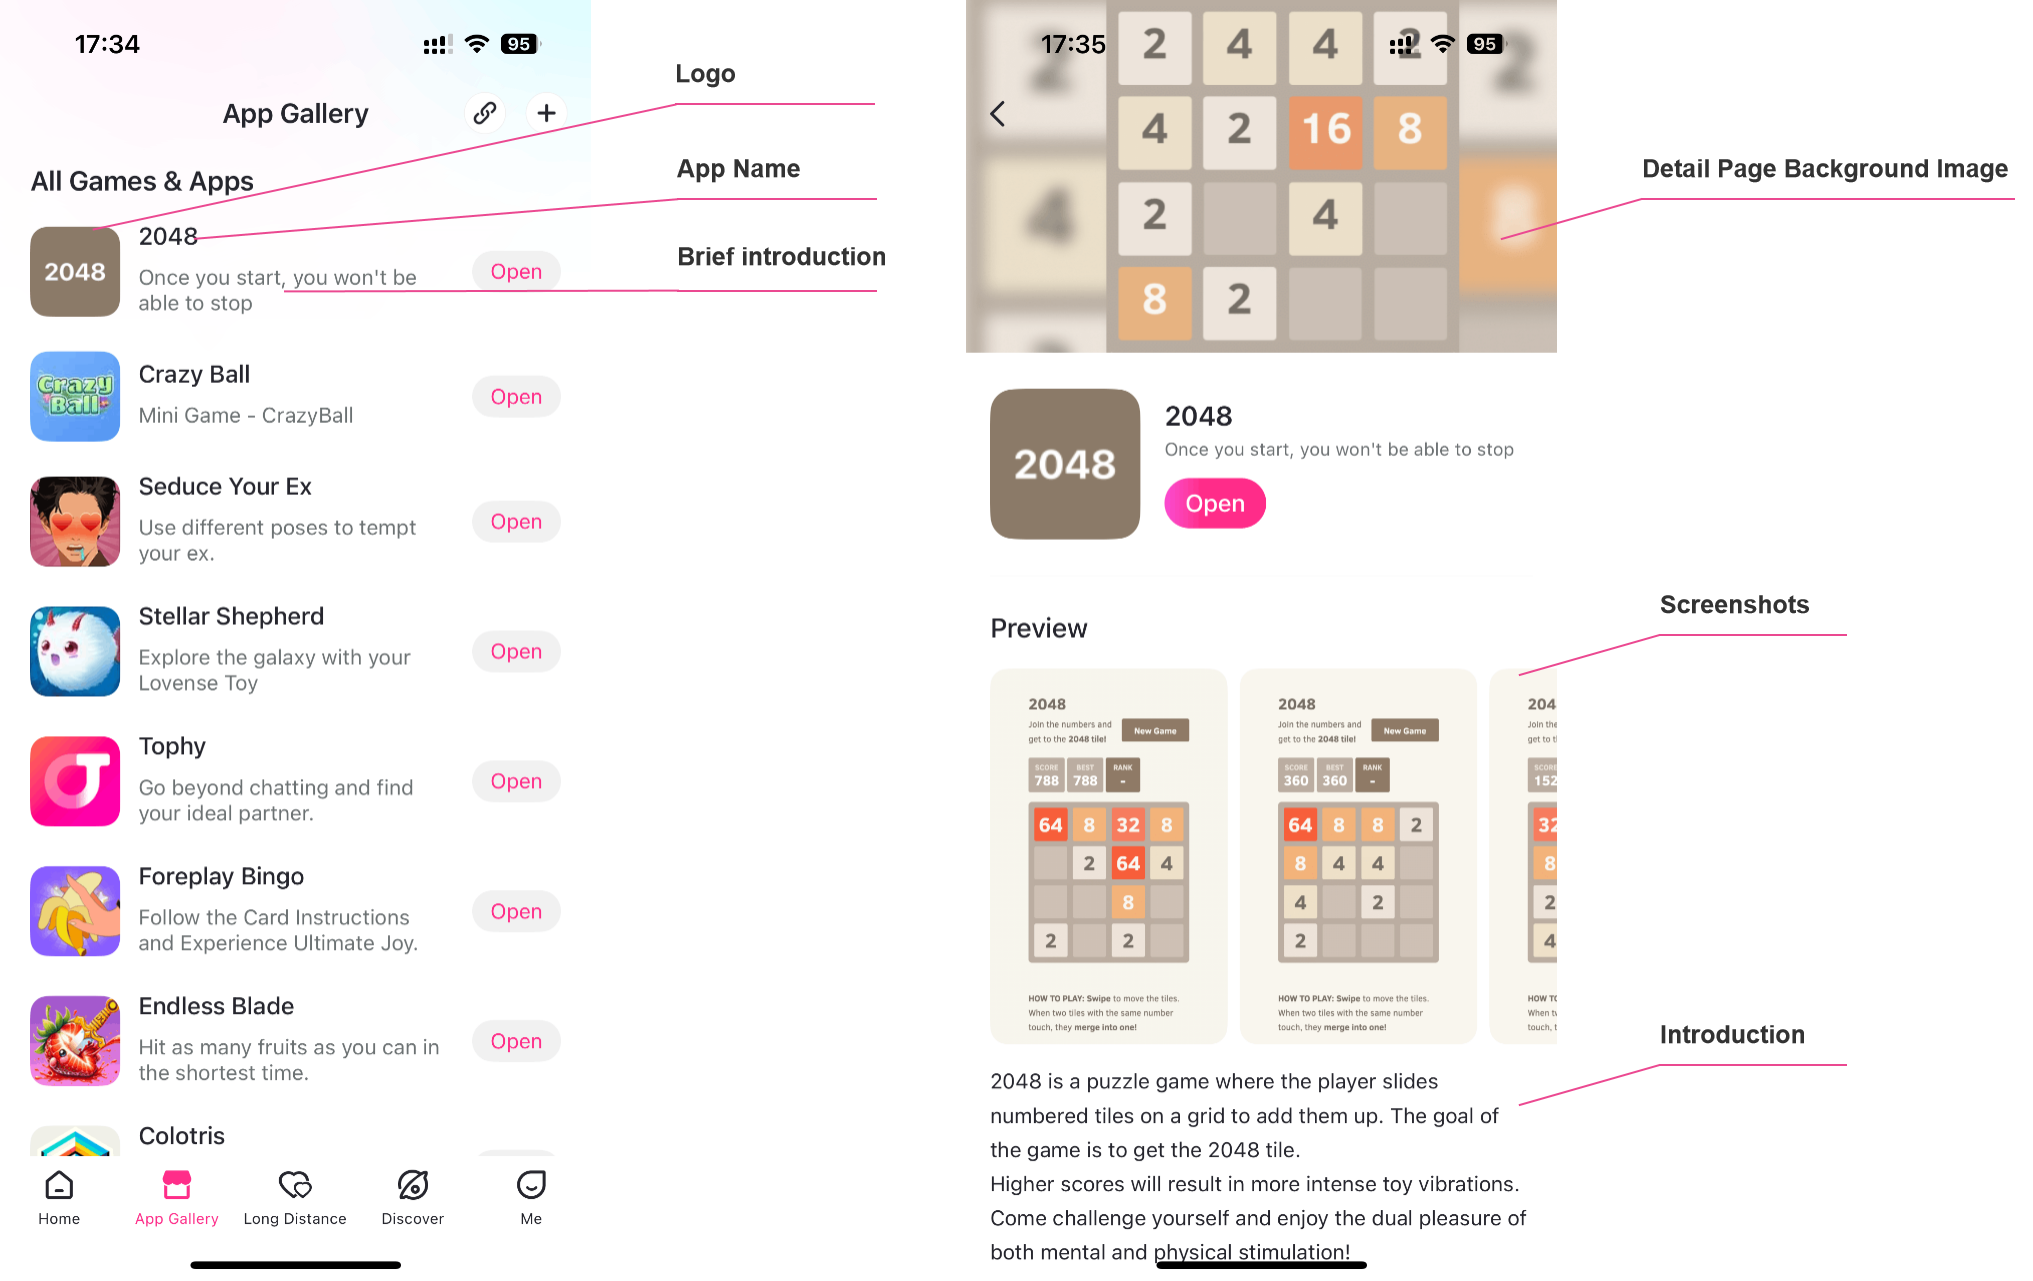
Example of Basic Information is displayed in App Gallery.
Step 3: Develop Your App
Integrate App Gallery
There are two ways to access App Gallery: URL and HTML5.
1. App Type: URL
For developers who already have a website for quick integration.
Integration Method
Integrate the SDK by introducing the following JS file in the html that needs to call the App Gallery APIs:
<script crossorigin src="https://cdn.lovense.com/appgallery/appgallery-v2.js">
2. App Type: HTML5
For developers who don' t have a website or those want a deep adaptation with App Gallery.
Integration Method
After uploading the source code as a .zip file, it will be hosted and deployed to App Gallery of the Remote App. For more details, refer to Deploy-2.HTML5.
Configuration File
Before debugging the app, you need to create a file, called appgallery_config.json. The appgallery_config.json file should be placed in the root directory of the Web App, which is used for global configuration of the app.

The file content is a JSON object with the following properties:
| Attribute | Type | Default | Required | Introduction |
|---|---|---|---|---|
| version | String | Yes | This version of the App Gallery SDK used by the mini-app, "2" will indicate that the 2.x version is being used. - This is currently version 2 and is supported by Lovense Remote App version 7.14.0 and above. - The mini-app functionality requires support from Lovense Remote App. Each new feature added to the App Gallery SDK requires a specific version of the Lovense Remote App. Some new features in a later version of the SDK may not be compatible with earlier versions of Remote app. | |
| appId | String | Yes | The appId is the App ID you create on App Gallery Console. | |
| appVersion | String | Yes | The appVersion is the version number you create on App Gallery Console. | |
| permission | Array | No | The permissions required by the Web App. Available permissions are: - user_info: User information - toy_info: Toy information | |
| allowDomains | Array | No | The allowed list of server domains is a restrictive measure implemented to ensure application security. In the case of API calls made by the web app, communication is limited to the domain names listed. For instance, only HTTP requests to the authorized domain names are allowed. |
Get the appId and appVersion from App Gallery Console.
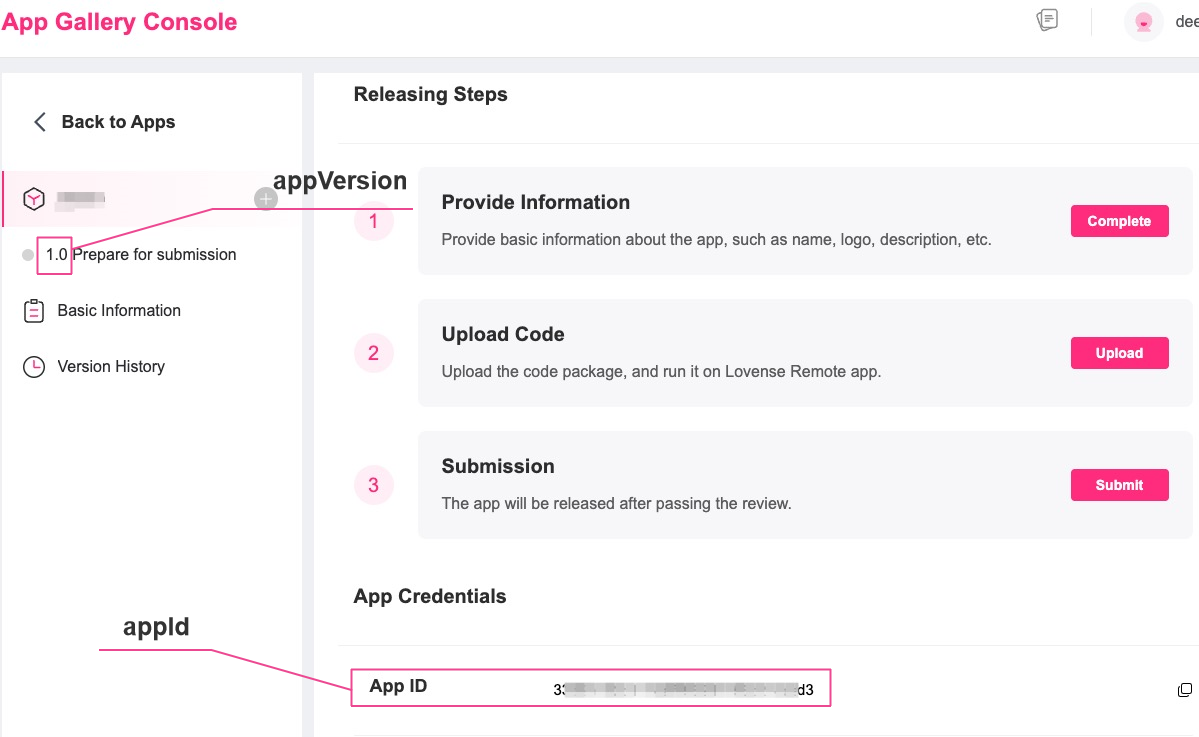
Example (appgallery_config.json):
{
  "version": "2",
  "appId": "is6cbb054xxxxea42xxx17f7xxx1abxxxxx",
  "appVersion": "1.0",
  "permission": ["user_info", "toy_info"],
  "allowDomains": ["*.example.com"]
}
Use App Gallery API
Refer to the APIs document to find out what functionality Lovense Remote app provides.
Step 4: Debug Your App
Enable Developer Mode & Select Debugging Method
Open the Lovense Remote app > Go to the "Me" page > OpenGo to the "Setting" page>Tap "Settings" at the top three times (there will be a switch of Developer Mode) > Enable Developer Mode (there will be a switch of App Debugging) > Tap App Debugging > Select the corresponding App Type according to Step 3 - Integrate App Gallery.
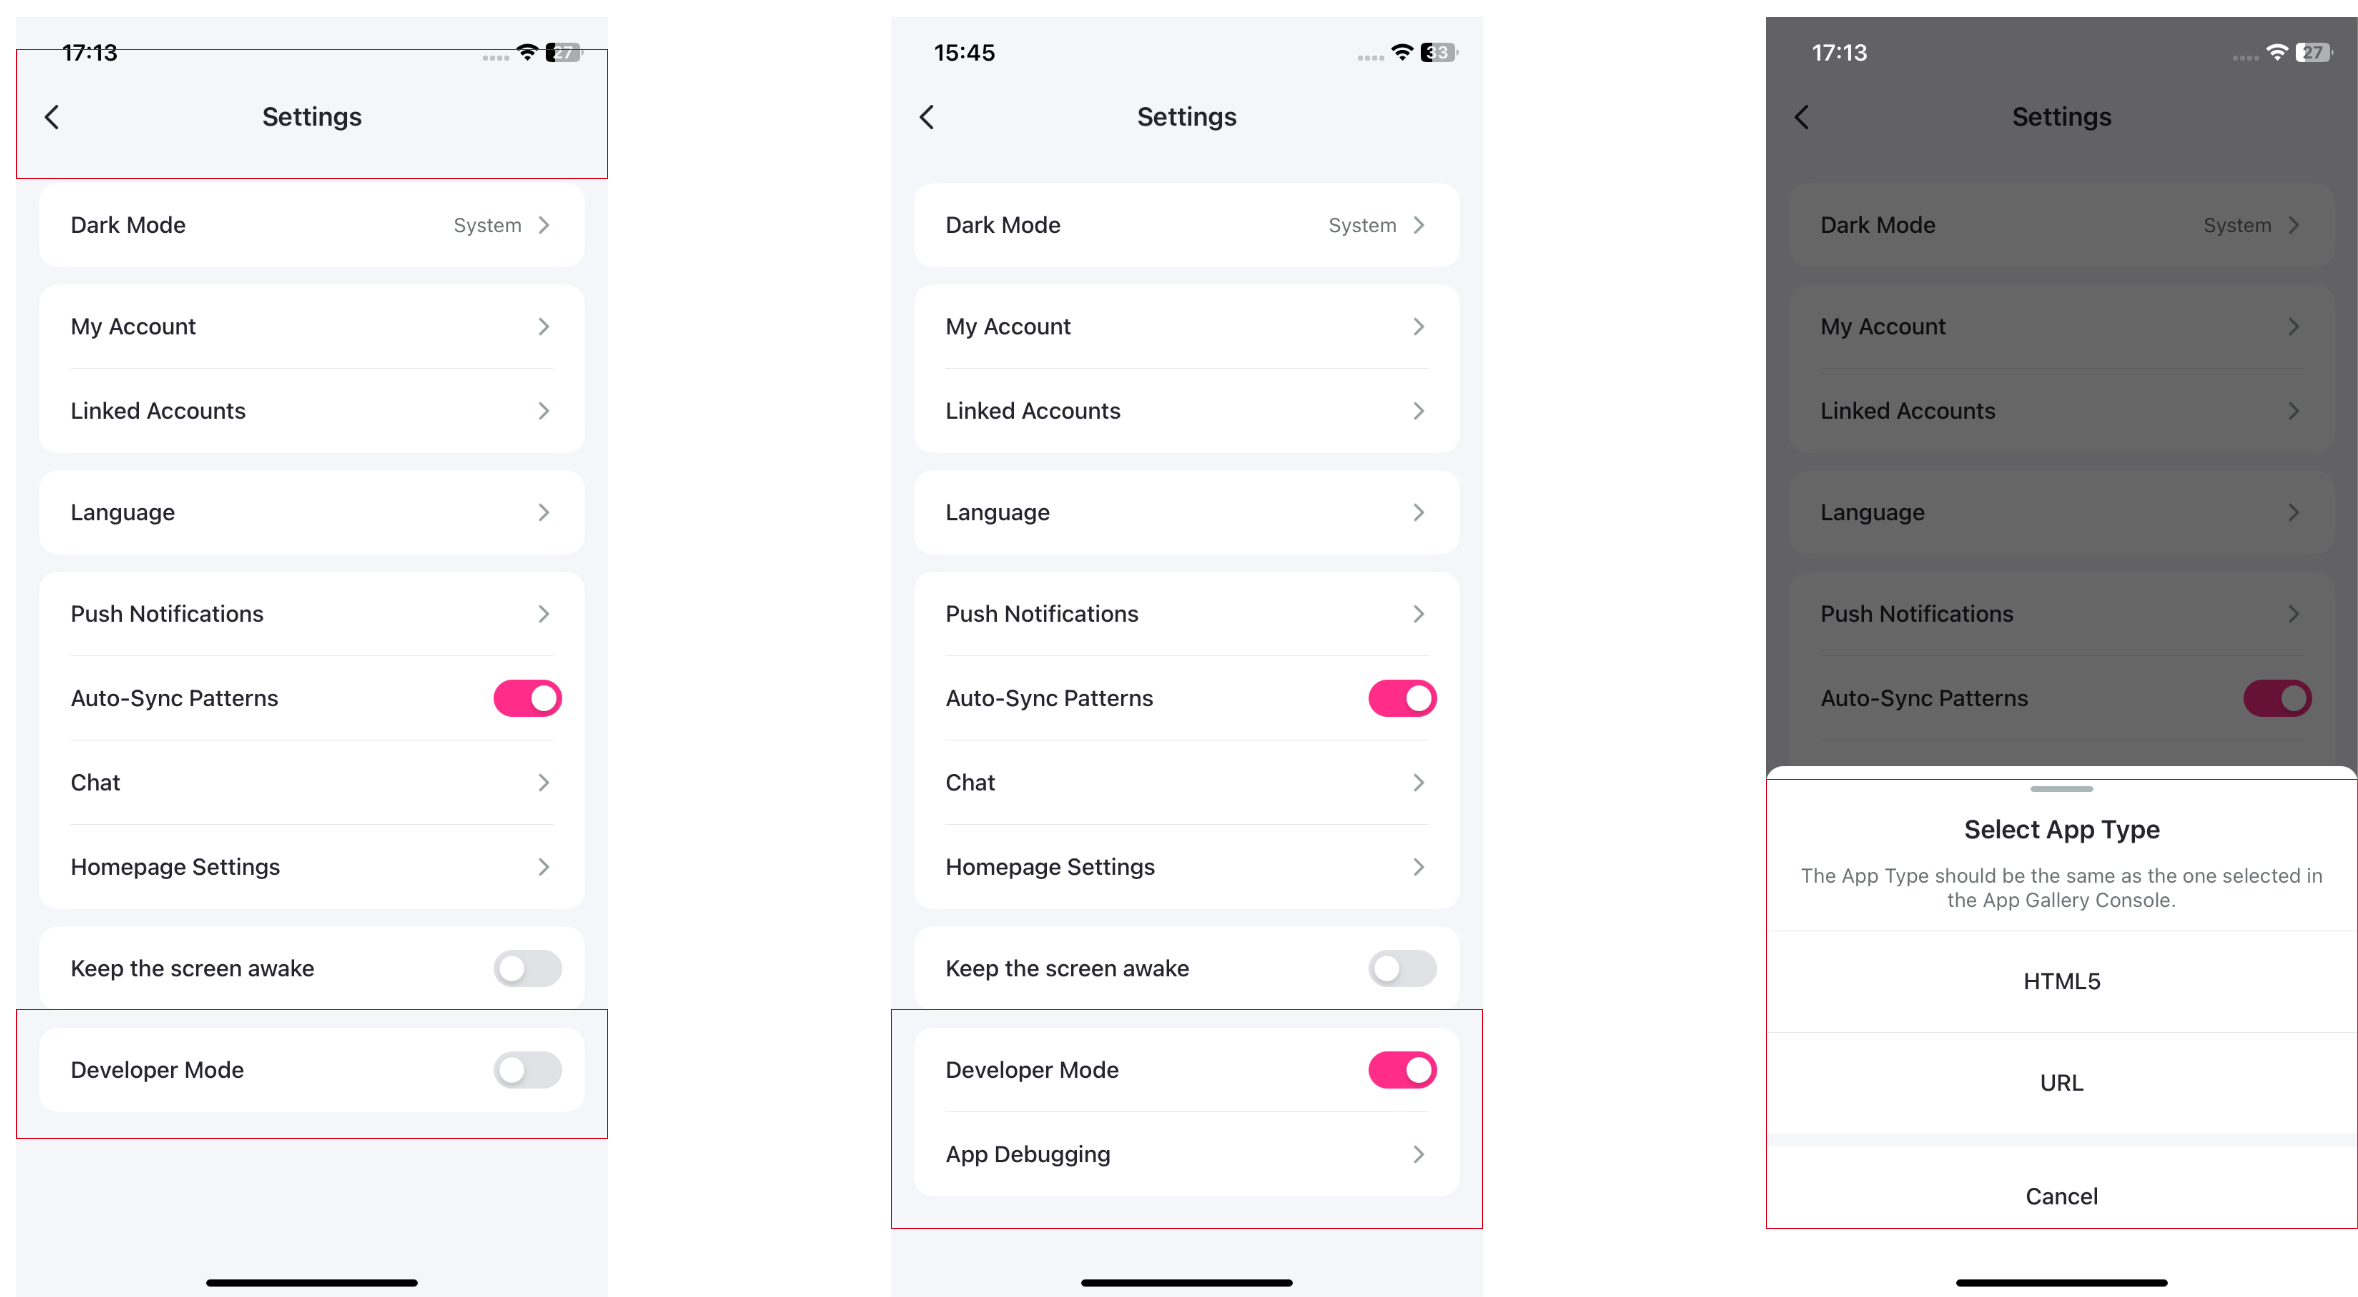
Tips: You can deploy the web app you're developing locally or to a server. The link should be:
https://server:port/index.html
Debugging
After scanning the QR Code or entering the url, Lovense Remote app will directly open your App page.
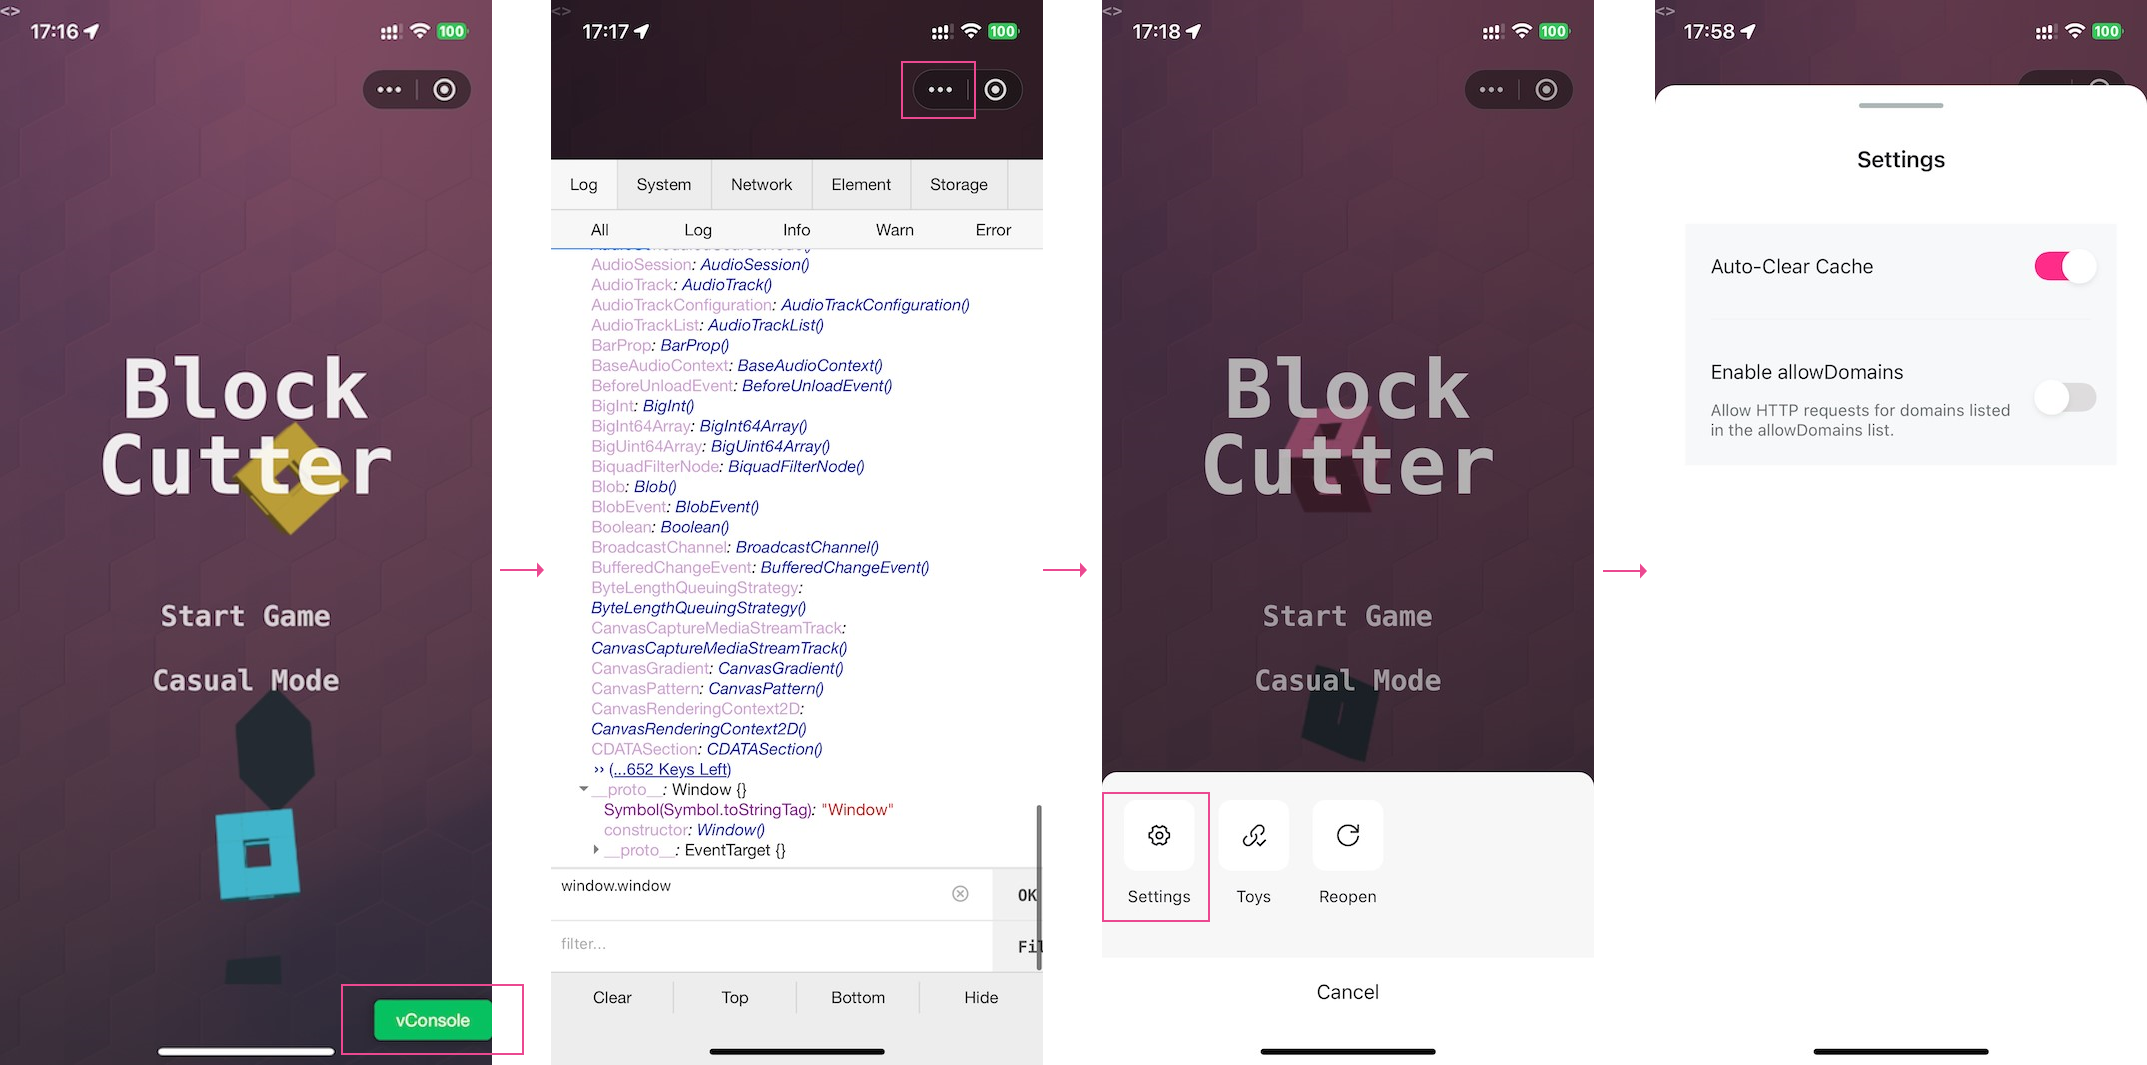
When you want to see the logs and additional debugging information output by the console, click on the button
vConsole.Click on the button
...(represented by three dots) in the top-right corner.Clicking
settingswill open the settings pop-up box, displaying two options:Auto-Clear CacheandEnable allowDomains. By default,Auto-Clear Cacheis enabled andEnable allowDomainsis disabled.If the app needs to access other links or resources via the network, you need to format all the access link domains, and configure into the
allowDomainsproperties in theappgallery_config.jsonfile, and enable the switch for theallowDomains. Then selectReopenor rescan the QR code to check.
